stackmachine
Member
Hey everyone! I spent a lot of time reading and absorbing information throughout this past year before finally arriving here. I love the community and all the knowledge sharing that goes on here.
I'm more knowledgeable in electronics engineering and chemistry than biology and genetics so this has been a great learning experience and hope to keep it going!
I constructed a large BOM before making any purchases and revised it several times based on what I learned from other people's mistakes and shared knowledge -- ty to Atom & all the others who shared their years of experience!
I was going to do my write-up on the MIT OpenAg site, but their future sounds uncertain so I'm just going to avoid it for now.
This is only my second MMJ grow. My first one was this summer, in soil pots in my back yard. After having to pick so many random seeds out of my herb I decided to take it inside.
I have some Cookies 'n Kush seeds as well as some Super Bud seeds and will be starting with a couple motherplants and will take cuttings as soon as they are big enough. I also bought a few packs of kale and stevia to try growing if there's any extra space outside the flowering tent.
So far I've got everything except the flower tent lighting and ventilation. I plan to order lighting from Digi-key in the next few days. I'm really liking the sounds of the Gen3 Bridgelux strips that don't require a heatsink when run at low power levels.
I'm not sure how much of a problem the negative air pressure is going to be with approx ~200CFM exiting the flowering tent. The basement isn't directly connected to the house, you have to go through the garage to get down here, but there is a vent into the basement from the furnace/AC.
Here's my BOM and design document: https://docs.google.com/spreadsheets/d/1PBExDBjCWoRktsUr1cME1Rk_sxHIM531YJPWgXNTr10/
I think I am just about ready to mix my first nutes, germinate some seeds in rockwool, and get started but there are a couple final things I have sort out starting with how many more misters I need to order (if any) and what that means for water usage.
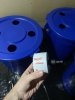
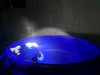
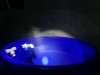
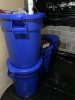
If it's possible to situate the misting nozzle directly in the middle of the 32 gallon trash bin it might provide enough coverage to get everything, but when it is connected to 12 inches of tube, facing directly upward it doesn't always produce mist because after a misting or two a bead of water begins forming in the center of the Tefen mist head and on subsequent mistings it just makes the bead bigger instead of spraying outward. (woops!)
Having the mist head at a slight angle eliminates this problem, but the bulk of the mist cone ends up being slightly lop-sided for the container. It does seem to cover most of the container when fixed against the wall, but I have a feeling when it's full of roots it may not work so well.
The other option I considered for the Tefen misters is purchasing a solenoid with 1/8" threads and sealing it with silicon tape and placing that in the middle, again held in place with a guide-wire or something else but I think it may have the same "bead problem" anyways. Air-assisted might be the way to go but I don't really have space for an air-compressor here.
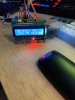
Here are a few photos of the bins with active mist. I had to turn the lights off and use a flashlight to really see the spray pattern. There are more here: https://imgur.com/a/UbWZK7s


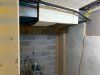
Here's a better view of what the actual grow space looks like, I still have to finish wrapping it in vapor barrier and constructing the tent:
The room itself is 12' x 5' but I only plan to make the flowering tent 4x4.
Any advise, suggestions or tips are highly appreciated. I'll try to take pictures any time I make a major change or see something noteworthy.
Cheers!
I'm more knowledgeable in electronics engineering and chemistry than biology and genetics so this has been a great learning experience and hope to keep it going!
I constructed a large BOM before making any purchases and revised it several times based on what I learned from other people's mistakes and shared knowledge -- ty to Atom & all the others who shared their years of experience!
I was going to do my write-up on the MIT OpenAg site, but their future sounds uncertain so I'm just going to avoid it for now.
This is only my second MMJ grow. My first one was this summer, in soil pots in my back yard. After having to pick so many random seeds out of my herb I decided to take it inside.
I have some Cookies 'n Kush seeds as well as some Super Bud seeds and will be starting with a couple motherplants and will take cuttings as soon as they are big enough. I also bought a few packs of kale and stevia to try growing if there's any extra space outside the flowering tent.
So far I've got everything except the flower tent lighting and ventilation. I plan to order lighting from Digi-key in the next few days. I'm really liking the sounds of the Gen3 Bridgelux strips that don't require a heatsink when run at low power levels.
I'm not sure how much of a problem the negative air pressure is going to be with approx ~200CFM exiting the flowering tent. The basement isn't directly connected to the house, you have to go through the garage to get down here, but there is a vent into the basement from the furnace/AC.
Here's my BOM and design document: https://docs.google.com/spreadsheets/d/1PBExDBjCWoRktsUr1cME1Rk_sxHIM531YJPWgXNTr10/
I think I am just about ready to mix my first nutes, germinate some seeds in rockwool, and get started but there are a couple final things I have sort out starting with how many more misters I need to order (if any) and what that means for water usage.
If it's possible to situate the misting nozzle directly in the middle of the 32 gallon trash bin it might provide enough coverage to get everything, but when it is connected to 12 inches of tube, facing directly upward it doesn't always produce mist because after a misting or two a bead of water begins forming in the center of the Tefen mist head and on subsequent mistings it just makes the bead bigger instead of spraying outward. (woops!)
Having the mist head at a slight angle eliminates this problem, but the bulk of the mist cone ends up being slightly lop-sided for the container. It does seem to cover most of the container when fixed against the wall, but I have a feeling when it's full of roots it may not work so well.
The other option I considered for the Tefen misters is purchasing a solenoid with 1/8" threads and sealing it with silicon tape and placing that in the middle, again held in place with a guide-wire or something else but I think it may have the same "bead problem" anyways. Air-assisted might be the way to go but I don't really have space for an air-compressor here.
Here are a few photos of the bins with active mist. I had to turn the lights off and use a flashlight to really see the spray pattern. There are more here: https://imgur.com/a/UbWZK7s
Here's a better view of what the actual grow space looks like, I still have to finish wrapping it in vapor barrier and constructing the tent:
The room itself is 12' x 5' but I only plan to make the flowering tent 4x4.
Any advise, suggestions or tips are highly appreciated. I'll try to take pictures any time I make a major change or see something noteworthy.
Cheers!