That temp could be okay depending on the strain but that sounds more like a night time range, i'd bump it to around 75-85 as long as it's bumping back and forth and not a steady 85.
Humidity sounds a little low, i'd bump it up in veg. You can be really high actually, up until you have bud you do not need to worry about it at all, keep it a balmy warm and tropical climate for veg.
LIGHT:
Well everyone will have their own opinion here. I've done it many ways and at one time adjusted the light periodically through growth stages. Now I believe the best way is to keep your light at the same height.
I'm 6"3, I use XXXL ocho's with 1K Watt Lumitec bulbs and keep them chest level around 3-4 inches under my collar bone lol.
This depends on many factors like your grow style, etc. However even if I'm doing a stringy sativa next to a squaty indica I'll still keep them at the same height.
What I'm getting at is do not adjust the lights, there's no point. No big deal if they're close or far honestly, I'll have buds sometimes that are almost touching the light.
It effects.
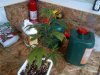
I like the height you have for veg, in the first picture. It's good to go for bud however you didn't top it correctly it has a lot of upwards growth, you'll want it more a little wider depending on your technique. I do in a 4X4, 6, 10 gallon smart pots in a 4X4 hydro tray in happy frog soil. The hydro-tray helps prevent over watering and gives it a nice clean look to the grow room.
What is the stain? Is this from seed? It looks like it from the pic
EDIT: I forgot to mention trimming, you'll want to eliminate a lot of the bullshit from the bottom half. Let the plant focus growth where it really counts, the higher half. If you'd like I could draw a quick diagram