oceangreen
Well-Known Member
Tools need
1. Drill and Drill bits
2. Tape measure
3. Electric saw
4. Wire cutters
Materials
1. Rigid plastic sheet 2mm
2. .75" mdf wood
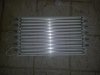
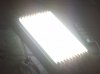
3. 12 T5 bulbs ( 8 2' 14w 6500k and 4 2' 14w 2700k) ( lights should come with brackets)
4. 24 1/4" philips head screw
5. 12 1/2 inch philips head screws
6. (11)3 head in/out harness connectors
7. Socket and extension cable
Your first step is to cut the rigid plastic to your preferred dimensions. for my design I did 24" by 14"
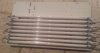
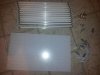
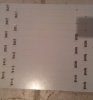
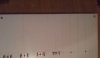
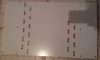
Next you want to figure out where to put the brackets so the lights are positioned properly and evenly. I went 1/2 inch from the edge, placed the tubes where I wanted them and marked the plastic sheet at the end of each tube( marked center of ends). I then made lines across from the 2 end points fro each tube, and placed the holdings brackets where i wanted them along the line. I did alternating, because i didn't want all the holes in one row because it would weaken the frame. you can see how I did that in the pic below
I then drilled the holes according to the size of my screw so it could fit nice and tight. Once I had the holes drilled, I went ahead and screwed in the brackets
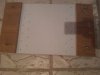
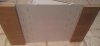
Now that the brackets are in its time to add the support frame. I cut 2 pieces of .75" mdf wood
14" x 4.5" so they fit perfectly into the frame. I place them on the back side of the frame. Now its time to screw the support frame in!
I carefully placed the support frame in the position i wanted them to be. NOTE: I am going to be drilling from the front of the see. YOU DO NOT WANT to drill all the way through so there is a hole on the back end, so be careful. I drilled the 2 end corners and the screwed using the 1/2 screws so they could stay in place, this made it easy to drill the rest of the hole without the frame moving. I did a total of 6 screws for each side.
1. Drill and Drill bits
2. Tape measure
3. Electric saw
4. Wire cutters
Materials
1. Rigid plastic sheet 2mm
2. .75" mdf wood
3. 12 T5 bulbs ( 8 2' 14w 6500k and 4 2' 14w 2700k) ( lights should come with brackets)
4. 24 1/4" philips head screw
5. 12 1/2 inch philips head screws
6. (11)3 head in/out harness connectors
7. Socket and extension cable
Your first step is to cut the rigid plastic to your preferred dimensions. for my design I did 24" by 14"
Next you want to figure out where to put the brackets so the lights are positioned properly and evenly. I went 1/2 inch from the edge, placed the tubes where I wanted them and marked the plastic sheet at the end of each tube( marked center of ends). I then made lines across from the 2 end points fro each tube, and placed the holdings brackets where i wanted them along the line. I did alternating, because i didn't want all the holes in one row because it would weaken the frame. you can see how I did that in the pic below
I then drilled the holes according to the size of my screw so it could fit nice and tight. Once I had the holes drilled, I went ahead and screwed in the brackets
Now that the brackets are in its time to add the support frame. I cut 2 pieces of .75" mdf wood
14" x 4.5" so they fit perfectly into the frame. I place them on the back side of the frame. Now its time to screw the support frame in!
I carefully placed the support frame in the position i wanted them to be. NOTE: I am going to be drilling from the front of the see. YOU DO NOT WANT to drill all the way through so there is a hole on the back end, so be careful. I drilled the 2 end corners and the screwed using the 1/2 screws so they could stay in place, this made it easy to drill the rest of the hole without the frame moving. I did a total of 6 screws for each side.
Attachments
-
 145.4 KB Views: 14
 -
 51.9 KB Views: 28