OffGridGrowers journey with ISS, Vsog (stadium)

offgridgrower

Well-Known Member
This grow is my 5th.
I tried outdoor a long time ago, didnt work out so well as I didnt have vast internet access at that time to get the good info.
The second grow was one plant in a 5gal bucket with holes drilled out the bottom in my closet in my second ever apartment, basic dirt in a bucket.
The third was the best so far, it was Afgani #1 pure shet my first aero setup with hid lights as well as my first Sog decent yield for the space 4x4.
The fourth was the highest yield all aero bigger hids, sog and a try at Sscog with a 4x8 net and a nice quite light mover, many lbs good times for sure!

This grow is going to be aero, sog, and stadium thanks to HBR https://www.rollitup.org/grow-journals/107654-hbrs-stadium-vsog.html . I love DIY so I will be building the majority of what I need starting with my aero cloner using a couple of the most popular plans on the net, one is off this site check out https://www.rollitup.org/hydroponics-aeroponics/116859-harvest-pound-every-three-weeks.html
I will be starting out with Island Sweet Skunk, using the aero cloner to clone, duh, and grow bags to start out with, I will be converting this area later down the road to be an aero/stadium setup but for now the stadium will just house the grow bags.
I will be using 30/30/20/20 spag moss,perlite,vermiculite,worm castings as my medium, hand watering for now.
I dont have a nute formula in mind yet I have a couple weeks to figure that out.

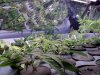
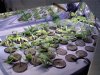
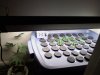
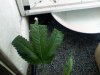
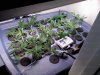
as of this weekend I got my ISS, and completed my aero cloner, I also got a surprise when I was told I could keep the mamma as well, yeah!!!
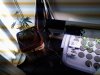
My cloner is a 25 gal ruffneck cause I wanted more than 25+ clones per unit I got 43 right now. Other than that all the rest is the normal componets that are on the net. Right now it under a dual t5 fixture, found at a pet store in my area, the mama is in a dwc solo using GH nutes for veg and hard water. I had to empty my cloner rez yesterday cause in one night the calcium had flaked out all in my rez and the ph was back to like 8, floated the babies in the tub and wash, and refill my rez again added a bit of hardwater GH floramicro to it and it checked fine today, the ph had jumped back up to 7 today lowered it will check again tommarow.

I know I have alot of work ahead of me but I wanted to get this started to mark my starting point and such so for today:
put mama in dwc with 2 gal water with only hardwater GH floramicro and adjust ph down from 8 to 6, using the dropper ph test for now, cheepo!!
got my timer today cap nft 1, 1min on 4min off running my cloner pump and dwc air pump on it
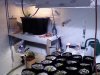
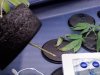
added a 2'x3' mylar sheet over the t5 and cloner so its like a tent, with the ends open, added another piece around the mama and its light (didnt snap a shot of the mama today, will try tomarrow, these pics are from this weekend before the dwc and extra lights)
 

Attachments

offgridgrower

Well-Known Member
Replaced the old bulbs today in the 4by floro with t12 cool white and daytime bulbs, they are hella brighter than the old bulbs were! still this is just a standby untill the veg room is complete
 

Attachments

SOMEBEECH

Well-Known Member
Think ill just sit right here. Sounds good,so you have grown hydro before?Been way to hot where i live but gonna get my trays going soon now its cooling off.
 

offgridgrower

Well-Known Member
ah, I was busy the last few days an i didnt do to much checking in on the girls, but I did last nite and whoop whoop I see roots!! 2 out of 7 are nippin! I could see anything else on the others but they all are still green , it did get cold the other day I hope that didnt do any harm!
 

Attachments

offgridgrower

Well-Known Member
well it looks like some of my friends are a lil behind on their schedules, because I got a mini xmas this weekend! some one needed their mamas cut back and guess who got to cut them! yea! plus I got my 2 clones of SourDiesel as well, they are the big ones in the back of the pic, they are already rooted so I have them in the cloner untill the veg room is complete.

but on a sour note, I think the sourdiesel has mites or something i noticed that the leaves had spots and their are micro black pin heads on the underside of the leaves, but i didnt see anything moving, is this major concern or am I tripping?

so I flushed all the h20 in both rez's again this weekend and put in distilled water and some route 666 for the cloner and some GH veg to the mama. we have hard water here and all that calcium was building up on my pump.
 

Attachments

SOMEBEECH

Well-Known Member
Sounds like you got some good friends.The reason i asked was 6 is a little high for you ph i start at 5.3 and let rise to 6 running at over 6 can lock out certain nutes.Hell i had a chart showing nutrient avalibility at ph levels but cant seem to find it this morn.Im not gonna tell you you need a better way to check PH you NO. Do you have a scope?Ive used a warm soapy water then rinse for mites.Whats the purpose ofthe tips being cut off the fan leaves.I see it all the time and never have asked so im asking, lol.I like your cloner.Im doing a get a harvest every 2 weeks in soil now and would like to have bigger starts as i need em every 2 weeks,but im gonna do it in my trays also so ive gotta get more moms are a faster cloning system.I dont know, you eat some shrooms lmao.WARNING ill be back.Gonna go bongsmiliesome more AK 47.Yep it looks like mites.Welcome to RIU.
 

offgridgrower

Well-Known Member
after being reassured that I do have mites I went out and pick up a bunch of organic stuff to combat the problem. https://www.rollitup.org/marijuana-plant-problems/96822-kill-your-spidermites-today.html

I started it out with some safer soap and cayenne pepper mix 3 1/2 cups of distilled h2o with 1/2 safer with 1 tbs of cayenne, mixed it up in a pitcher and dunked everything, expect the mama, I had to mist her.

if after 3 days I see any signs that I still have mites, I will use the mite exterminator mix , that should take care of the problem, Note to self sterilize and disinfect the shit out of the new place!!!!!!
 

offgridgrower

Well-Known Member
so I dunked again yesterday, and really looked at the plants and still didnt see anything moving around. how powerful of a lens do I need to be looking at them with? defiantly have to use a dome on the babies cause I tried leaving the dome off for a day and in a few hours the babies were really droopy so I put the dome back on and they look fine again so there it is, for the time being gotta use the dome. I didnt know that the t5's can be so hot, i got a max read of 85f at just 6ins from the light, wonder if its ok to raise the t5's higher.
 

Attachments

offgridgrower

Well-Known Member
so I still dont see any moving mites so I think it was just a scare but i will b keeping my eyes open. on a better note, the plans for stinkbuds ez cloner are the sheznit, 23 out of 30 cuttings are rooted and this in just at 2weeks!!, im sure they all will root, so im so happy that i know i can root in 2 weeks so sog will go great!!! I had a couple of cuttings do some weird swelling up on me, i took a pic so you can a see it, the part that grew big was the part that was in the neoprene collar, once i noticed it and move the clone a lil higher in the collar the roots sprouted the next day, sweet!! 2 clones did this to me, so I think its better to have the cutting in the dead center of the collar next time. Im having serious ph issues, it rises every day!! I belive it is because the light from the t5 is penatrating the lid and causeing just enough havoc to the h2o but not enough for algae growth. I noticed this light when i lifted the lid on the cloner to test the ph, i could tell that when the lid is closed the lite from the t5 is strong enough to come thru the lid, so im going to paint it this weekend, silver using spray vinyl paint that aborbs into the plastic and wont flak off, i have been drinking so f all the spelling i can see the red lines but i dont care. lol because my cloner works like its supposed to!!
 

offgridgrower

Well-Known Member
just wanted to say that i tried to take a pic of the veg room once i finished it, but its in a space that when i take the pic you cant really see the total size, you really only see the tables, so i will take another with all the plants on it, that would be better anyway.
 

offgridgrower

Well-Known Member
veg room is 100% complete ! yea but my fone died so i couldnt take any pics today, I will tomarrow tho for sure!!
 

offgridgrower

Well-Known Member
here are the veg room pics, finally was able to get a decent shot of all three parts working,8x8x8 tent, i have a 3'x8' table with a 400MH over it, and a 2'x4' area setup to hold the cloner and the mamas, but I think Im going to flip them an put the cloner on the ground where its cooler, this tent is made with 2"x3" with panda roll stapled to it, then taped over. Its pretty damn air and light tite! (thanks to my light traps I made to day, go to next post)
 

Attachments

headbandrocker

Well-Known Member
lookin good-
if your tryin to kill mites-spray plants with floromite
and spray down room with 1o%h2o2 the floromite will be your best friend,and theyre worst enemy
Veg room looks sweet!!
 

offgridgrower

Well-Known Member
here we go this attempt to do a DIY and actually post the instructions, lol

If there are tons of these I apologize I do know a couple people wanted me to do this so here you go.

First off I'd like to say I actually f'd this up and had to make a 3rd trap, larger because I didnt do my math correctly and ended up with 2 traps that were half the size i needed, so here it is MEASURE TWICE CUT ONCE!! The rule is your intake should be twice the size of your exhaust, my exhaust is 6in vortex fan so my intake should be at least 12in. I used foamcore because 1. I have a tent made of plastic film and wood studding, 2. I have foamcore laying around because I use it as a canvas for airbrushing, you could use wood or metal if you so choose to and have the skills to work such material.

What I needed was a 12in hole, what I made ended up being a 6in hole because after putting the baffles together, I had made them too small thinking that a 6in vent was what i was making. But I was making a 3inx3in opening with the measurements I was using. You will end up cutting out 7 pieces in total the size you want them depends on the size you need but 2 make it easy use a number you can half easily so if you need some off number just round it up to the next number you can half easily here is why,
the 2 pieces you put in the middle are called the baffles, they are what block the light but also restrict your airflow, so what you have to do is find a number ( my correct number should have been 14inx14in face with a 10inx10in center vent hole)
i used an 8inx8in square with a 6inx6in squared centered on it, with 2in vents cut into the center square


you cut 4 pieces for your sides that form a box frame, here i used 3inx6in pieces, i used 1in for my center line for the bottom baffle (i should have just went center here, 1 1/2in) here you see the sides and bottom plate with the bottom baffle from overhead


Here is the top plate and the top baffle (here I should have just made a 90 with these pieces, I should have just went flush with the top baffle to the back of the top plate, here it is 1in of the end)


Here is a pic of both traps front and back, as you can tell my exit hole is really small it is 2inx6in (the problem here is that both traps together are 4inx6in and the baffles are further restricting the airflow because i didnt center the bottom baffle and flush the top baffle) also if you notice the pic above the bottom baffle was to small and let light out I had to go back and make it 2/3 the size of the vent hole the 1st was 3inx6in I went back and put a 4inx6in baffle in it and made the top baffle the same size as well


Here is the pic of the larger one I had to make with all the adjustments mentioned above, sorry for the lack of pics but I was busy and this took longer than I had expected so I didnt have the time to keep stopping to take pics here my face is 14inx14in with a 10inx10in vent hole, 5inx10in sides with 5inx10 1/2in top&bottom plates with baffles 7inx5in centered on the bottom and flush on the top


Here is a pic of the traps on the inside of the tent , TAKE NOTE OF THE BLUE LINE THATS THE ZIPPER IN THE NEXT PIC (the other smaller trap is on the same wall as this small one just out of the frame)


And heres proof they work, THE WHITE LINE IS THE ZIPPER FROM THE OUTSIDE THE TENT. THE ONLY PLACE WHERE YOU CAN SEE LIGHT!!!THIS SHOT IS THE EXACT OPPOSITE OF ONE ABOVE IT JUST FROM OUTSIDE THE TENT
,

I found out I had made the traps too small when i cut them in and zipped up the tent with me inside it, the floor started to rise up, and I heard plastic popping of staples the wood was stressing and I knew the holes were too small!!!! whipped out the tape measure and after the adreniline wore off I knew I had used the wrong measurements so off to make another larger one and to mod these because I could see light from the top vent, but now with 3 in place and the door zipped up its just rite, serious airflow, good temps and humdity!!
I feel good about this one!!
 

offgridgrower

Well-Known Member
Ok I got the panda roll up and the stadium in, I still have to seal it up and cut in the venting but here she is!!


headbandrocker

Well-Known Member
Dooooooood! Nice job-looks great o.g.g.
looks very sturdy too,how many ladies gona warm those benches?
Props too you sir-hbr
 
Top