Proper Way To Grow Seedlings??

Young420ist

New Member
I've Read Many Peoples Growingg Journals And Threads But iWant Some Seedling Information That iNeed And That Im Goingg To Use For Sure.:weed:
 

farmerjoe420

Well-Known Member
start your seeds in a moist jiffy peat pot or ( preferbely ) a moist rapid rooter. dont waste your time soaking seeds and using unnecessery methods of seed starting that give beginners problems just remember that plants want to grow on their own and just need a little help getting started from us, just keep it simple. when your seed sprouts above ground and you see roots in the seed starter cube, transplant into a small pot, like 4", using seed starting mix or pro-mix. just water and dont feed for about two weeks as your seedling will be developing a root structure during this time and very little fertilizer is needed. if your using fox farms light warrior and there nutrient line you can use big bloom in small amounts as directed but otherwise no fertilizer. after 2 weeks, transplant into a complete soil with nutrients or begin feeding a very dilute nutrient solution and gradually increase dosage over a period of time.
 

farmerjoe420

Well-Known Member
these are a seedling i have that were started 18 days ago. i dropped the seed in a moist rapid rooter and it sprouted above ground and had a root growing out and up the side of the plug in 36 hours. i really like rapid rooters. the first 3 were exactly 7 days ago and the last 3 were today. i grew this and every other seedling the same way i described.
 

Attachments

Burger Boss

Well-Known Member
I fully agree with the no seed soaking in paper towels. But why the rapid rooters?
Why not just place seed in 3" peat pot and soil, and germ from there?
I built a "Germination Station" using half of a 8 light bathroom fixture, a mylar automobile windshield sunscreen for a hood, a domed start chamber, a heat mat, and peat cups. I then put the peat pots in a small plastic cups with a small H2O reservoir in bottom.
I started my 2011 outdoor grow on Dec. 27, 15 strains. Pix below of Station, and
25 days of progress, they are now in 1 gallon grow bags.
Good luck & good grow.......BB
 

Attachments

greenkrakzak

Active Member
dude, just get em wet, it doesnt matter in what medium, put it in a shot glass, between paper towels, or drop it in the soil. it all works, just some people say some ways are better than others. do your thang man
 

farmerjoe420

Well-Known Member
I fully agree with the no seed soaking in paper towels. But why the rapid rooters?
Why not just place seed in 3" peat pot and soil, and germ from there?
I built a "Germination Station" using half of a 8 light bathroom fixture, a mylar automobile windshield sunscreen for a hood, a domed start chamber, a heat mat, and peat cups. I then put the peat pots in a small plastic cups with a small H2O reservoir in bottom.
I started my 2011 outdoor grow on Dec. 27, 15 strains. Pix below of Station, and
25 days of progress, they are now in 1 gallon grow bags.
Good luck & good grow.......BB


dude if you read the whole thread you would see i initially suggested jiffy peat pots or rapid rooters. i personally like rapid rooters because they have the perfect air to water ratio, they have soil microbes to colonize roots and they have added micronutrients none of which you will find in peat pots which have a low ph to start and no other added benefits but the point i was trying to make was keep it simple and dont make things more complicated and technical then they have to be.
 

biffchicken

Well-Known Member
I've had 100% success with just putting a 1/2'' hole in the soil, placing the seed in hole, covering with dirt, making sure the soil stays moist until it sprouts.
 

Lt. Dan

Well-Known Member
My first time, I started 8 seeds and got 7 to pop in 3 days. I used rockwool starter cubes, soaked in 1/4 strength nutes, pH 5.8.
 

Young420ist

New Member
All of This Stuff Is Good Info But Im Focused On The Seedling Stage Not The Germination Stage..When I Plant The Sprouted Root Into The Soil How Should I Take Care Of It? (THE CORRECT WAY)
 

farmerjoe420

Well-Known Member
All of This Stuff Is Good Info But Im Focused On The Seedling Stage Not The Germination Stage..When I Plant The Sprouted Root Into The Soil How Should I Take Care Of It? (THE CORRECT WAY)

just water and dont feed for about two weeks as your seedling will be developing a root structure during this time and very little fertilizer is needed. . after 2 weeks, transplant into a complete soil with nutrients or begin feeding a very dilute nutrient solution if growing in a soilless mix and gradually increase dosage over a period of time.

if your soil has nutrients in it, follow the directions for feeding. if usiing a soilless mix like i said start feeding slowly.
 

farmerjoe420

Well-Known Member
if you mean a flat with a humidity dome yes. use it until clones root or seeds sprout and then harden off clones and take seedling sprouts out and put under a light.
 

r1tony

New Member
Soon as mine tap a root about 1/2" long they go right into neoprene collars in my aero/nft stinkbud system they never touch medium and do awesome.
 

aint got a scooby

Active Member
dude, just get em wet, it doesnt matter in what medium, put it in a shot glass, between paper towels, or drop it in the soil. it all works, just some people say some ways are better than others. do your thang man
totally agree, i soaked in glass of water for 24hrs then dropped seed (anyway up) into watered soil, covered and ive had 100% success so far.....
 

Mother's Finest

Well-Known Member
Here's our current method:

Use bottled and/or filtered water, which can be made into a 1/4 strength Maxicrop solution. Pour some of this liquid into a small cup (a white coffee cup works well, white so you can see seeds easier and heavy to avoid tipping) and toss in the seeds. Throughout the process, the little ones should be kept at or just above room temp. Leave them to soak in a warm, dark place for 24hrs, stirring occasionally or whenever convenient (stirring more than once or twice is not absolutely necessary but speeds up the process). After 24hrs give them one final stir and allow the mixture to settle- inviable seeds will float while live seeds will sink. Fold one single paper towel 3 times and place on a plate. Wet the paper towel with the MC solution (if unavailable use plain bottled/filtered water). Tilt the plate and allow any excess water to run off. Place your hand gently on the paper towel while the plate is tilted to squeeze out a little of the water being held by the paper towel. Never use any chemical fertilizer on seeds or sprouts. Open the last fold of the paper towel and place all live (sank to bottom of cup) seeds inside (not touching each other). Any seeds still floating may be left to soak for another 24hrs, once in awhile one or two more will sink but not often. Put the plate in a warm, dark, draft-free area. Do not allow temp to go above 85 or below 65. Should the towel start to dry out, add fresh MC solution and drain as before. The paper towel should always be moist but not soaked. Once the root starts poking out the seeds cannot be submerged in water, needing some small amount of air. After the roots poking out of the seeds are at least 1/4in but no more than 1/2in long it is time to plant them.

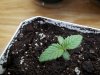
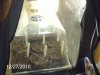
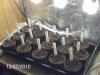
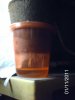
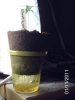
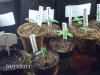
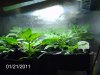
Prepare plastic drinking cups by poking drain holes in the bottom and filling with either seed starter soil or some other fairly inert medium, no higher than an inch from the top of the cup. Moisten the soil with the same soution used to germinate the seeds untill a handfull of soil leaches just a few drops of water when squeezed. Poke a hole in the soil of each cup with a toothpick and place the stem coming out of each seed into the hole, being careful not to touch the root. Gently push the soil snug around the root. Cover the cup with a piece of plastic wrap and poke two finger sized holes in the edges of it for ventilation. Place the seedlings no closer than about 7 inches to a florescent light. Once the seeds stand up and begin shedding their shell, it's safe to remove the plastic wrap. It can be left on the cup to help the seedling get its shell and membrane off as long as it doesn't bump into the plastic. This room for growth is one reason why the cup isn't full of soil. Wait about 24hrs then move the plants to the "normal" distance from your floros. Occasional misting will help the seedling get its shell & membrane off if it needs some help. These can also be removed manually but I won't go into that technique here.

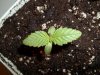
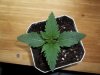
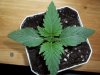
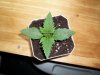
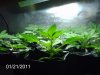
Once the 3-bladed leaves first appear, they can be transplanted into fertile soil with Worm Castings and other amendments. They need to be transplanted by the time the first 5-bladed leaves start growing in as they'll need both nutrients and larger pots. A very good soil mix is 3 parts potting soil, 1 part perlite and 1-1.5 parts Worm Castings with some Blood, Bone and Kelp Meals added. Imo, Edna's Best is a great potting soil and Black Gold also has a good, simple mix with a nice consistency.
 
Top