PurpleRhinoceros
Active Member
The Goblin and Elf inspired me to do this. Suggested Retail: $108.95
 (Pictured Left: Goblin Charcoal Filter)
Nothing against buying those, but this Shop-Vac® Carbon Filter is for those can't and still want to put a decent Carbon Filter together. As it is one of a growers most important tools of security.
The Shop-Vac® Filter Cartridge fits so perfectly flush, into the MasterFlow® Starting Collar, that Duct Tape might not even be required to seal that connection. Also there are multiple other brands of dry/wet-vacs and even generic multipurpose vac filters that will work exactly the same. Two filters can bet stacked together to create a 2x long barrel.
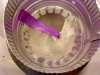
Virtually any screen can be used. For example, I have demonstrated using Stiffened Felt, then started it over again with the aluminum screening. There are generic 6" starting collars for slightly cheaper at your local hardware store that can be used as well. Reducers can even be used in place of the Starting Collar to create Cylindrical Screens.
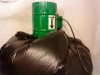
The Collar, Screen, Canister, and Carbon are my filter's four main components. All of which can be found at Wal-Mart, although you might have to shop around at your the local hardware, pet, and craft stores.


(Pictured Above: MasterFlow® Starting Collar w/Screen inserted into Shop-Vac® Filter Cartridge and Filled with Carbon)
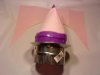
(Pictured Bellow: Proof of Life)
 View attachment 1297516
Shopping List:
1 6" Starter Collar - $4.48
1 Shop-Vac Filter Cartridge - $9.99 (Walmart or Sears)
1 Half Gallon of Activated Carbon - $10.00
1 Square Foot of Screen or Stiff Fabric - $8.00- $1.00(One Sheet of Felt)
Total: $30ish Bucks
Forewarnings:
Not included in price estimate: 69 inches of duct tape.
If using Stiffened Fabric, might also require the use of sewing needles or glue to form cone or more duct tape.


Step 1. Cut a Circle out of approximately 1 square foot of your chosen "Screen". Cut a slit toward the center of the Circle (DO NOT cut the slit longer than the radius of your circle). Then Fold to create Cone and affix to "Collar" with Duct Tape.
(Cone Can be placed upside down into the collar for reverse airflow. Requires more carbon.)


Step 2. Insert Male End of "Collar+Cone" assembly into Female End of Shop-Vac "Cannister" and Seal with Duct Tape


Step 3. Remove Cover on "Cannister". Fill "Cannister" with "Carbon". Cover. Then Seal with Duct Tape.


Additional Tips:
Conical Shape is not completely necessary.
Secondary option is to tightly wrap the screen over one end of the collar like a drum. This method requires more carbon to fill the extra room in the cannister.
There are a multiple of other options besides the drum and cone screens. A third trickier rig would involve replacing the collar with a 6" to 4" reducer and the plastic end cap with another 4" to 6" reducer. Place one reducer 4" side up. Wrap the screen around the top to create a cylinder. Tape. Place cannister on top of that. Tape the bottom of the cannister to the reducer. Fill with carbon. Place second reducer on top of that. In this case lets go with 6" side down. Fill furter with carbon. Filling will be done around the screen cylinder poking through the 4" hole in the topside of the reducer. Once filled, trim the screen cylinder to be flush with the end of the reducer. Tape sealed. And put a 4" cap on it.
The Shop-Vac Cannister can be upgraded to the HEPA grade cartridge. Follow the link for more options.
HEPA without the carbon would be great for an INTAKE filter. Skips a step for making a screen as well.
The "Collar" and "Aluminum Screen" assembly can be re-used.
While, replacing the "Carbon" and "Cannister" will be a routine $20. Months that they last depends on quality of carbon and filter.
Activated Carbon Pre-filter is strongly suggested.
Although, Buying the collar isn't completely necessary, if you have a miscellaneous 6" duct piece that you think can work, give it a try. For ventilation systems that are 4" or 8", Reducers can be used in place of the collar to better integrate into the desired system.
Extras: Any Other Hacks to the Dry-Vac Filter will be added here.
Foam Sleeve

The Crafstmen Filter
Special Filter for Cleaning Fireplaces. In other words, it is specified to work with burned charcoal.
"Ultra Web"
Pre-Filter?
Nothing against buying those, but this Shop-Vac® Carbon Filter is for those can't and still want to put a decent Carbon Filter together. As it is one of a growers most important tools of security.
The Shop-Vac® Filter Cartridge fits so perfectly flush, into the MasterFlow® Starting Collar, that Duct Tape might not even be required to seal that connection. Also there are multiple other brands of dry/wet-vacs and even generic multipurpose vac filters that will work exactly the same. Two filters can bet stacked together to create a 2x long barrel.
Virtually any screen can be used. For example, I have demonstrated using Stiffened Felt, then started it over again with the aluminum screening. There are generic 6" starting collars for slightly cheaper at your local hardware store that can be used as well. Reducers can even be used in place of the Starting Collar to create Cylindrical Screens.
The Collar, Screen, Canister, and Carbon are my filter's four main components. All of which can be found at Wal-Mart, although you might have to shop around at your the local hardware, pet, and craft stores.
(Pictured Above: MasterFlow® Starting Collar w/Screen inserted into Shop-Vac® Filter Cartridge and Filled with Carbon)
(Pictured Bellow: Proof of Life)
View attachment 1297516Shopping List:
1 6" Starter Collar - $4.48
1 Shop-Vac Filter Cartridge - $9.99 (Walmart or Sears)
1 Half Gallon of Activated Carbon - $10.00
1 Square Foot of Screen or Stiff Fabric - $8.00- $1.00(One Sheet of Felt)
Total: $30ish Bucks
Forewarnings:
Not included in price estimate: 69 inches of duct tape.
If using Stiffened Fabric, might also require the use of sewing needles or glue to form cone or more duct tape.
Step 1. Cut a Circle out of approximately 1 square foot of your chosen "Screen". Cut a slit toward the center of the Circle (DO NOT cut the slit longer than the radius of your circle). Then Fold to create Cone and affix to "Collar" with Duct Tape.
(Cone Can be placed upside down into the collar for reverse airflow. Requires more carbon.)
Step 2. Insert Male End of "Collar+Cone" assembly into Female End of Shop-Vac "Cannister" and Seal with Duct Tape
Step 3. Remove Cover on "Cannister". Fill "Cannister" with "Carbon". Cover. Then Seal with Duct Tape.
Additional Tips:
Conical Shape is not completely necessary.
Secondary option is to tightly wrap the screen over one end of the collar like a drum. This method requires more carbon to fill the extra room in the cannister.
There are a multiple of other options besides the drum and cone screens. A third trickier rig would involve replacing the collar with a 6" to 4" reducer and the plastic end cap with another 4" to 6" reducer. Place one reducer 4" side up. Wrap the screen around the top to create a cylinder. Tape. Place cannister on top of that. Tape the bottom of the cannister to the reducer. Fill with carbon. Place second reducer on top of that. In this case lets go with 6" side down. Fill furter with carbon. Filling will be done around the screen cylinder poking through the 4" hole in the topside of the reducer. Once filled, trim the screen cylinder to be flush with the end of the reducer. Tape sealed. And put a 4" cap on it.
The Shop-Vac Cannister can be upgraded to the HEPA grade cartridge. Follow the link for more options.
HEPA without the carbon would be great for an INTAKE filter. Skips a step for making a screen as well.
The "Collar" and "Aluminum Screen" assembly can be re-used.
While, replacing the "Carbon" and "Cannister" will be a routine $20. Months that they last depends on quality of carbon and filter.
Activated Carbon Pre-filter is strongly suggested.
Although, Buying the collar isn't completely necessary, if you have a miscellaneous 6" duct piece that you think can work, give it a try. For ventilation systems that are 4" or 8", Reducers can be used in place of the collar to better integrate into the desired system.
Extras: Any Other Hacks to the Dry-Vac Filter will be added here.
Foam Sleeve
The Crafstmen Filter
Special Filter for Cleaning Fireplaces. In other words, it is specified to work with burned charcoal.
"Ultra Web"
Pre-Filter?