Organic Headband 707 ScrOG (400 watt MH/HPS)

TheNaturalist

Active Member
Hey everyone!
I am new to ROI and on day 47 (started 2/2/12) of my first ScrOG grow. I will catch you all up to speed in this post and then keep a regular journal starting just in time for the bud porn :blsmoke:. I noticed a rule in the sticky's not to post in someone's journal unless asked :confused: well please feel free to post here! If it weren't for other peoples advise I wouldn't know a thing about growing so i'm not going to start turning it down now! Im scared to post in other peoples journals now, but if you think I would find your grow interesting then go ahead and invite me and ill come check it out. Anyways. heres the info on my setup:

Tent: GL 80 (2.5 x 2.5 x 5.9)
Light: 400 watt MH/HPS cool tube
Ventilation: 400 CFM inline fan w/ carbon filter
Genetics: 707 Headband (2 clones)
Soil: FFOF
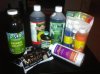
Nutes: BioBiz (Grow + Bloom), Neptune's Harvest (fish+kelp mix), Blackstrap Molasses, CalMag supplement
Pesticide: Organic Cedar Oil

And heres some pics, im not sure what date each one was taken but they will take you from the start up through today:

Full shot of tent
IMG_2584.jpg

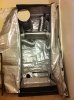
Air is pulled through carbon filter and then pushed through cool tube and out the top of tent. I now know that its inefficient to push air and the fan should be at the very end so it pulls air through the whole system but 400 CFM is enough to replace the air in my tent every 10 seconds so i'm not too worried, ill fix it before my next grow.
IMG_2595.jpg

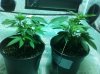
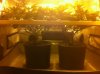
The headband clones are in the pots. Ignore the other 2 clones, I got them first and cooked them my first night when my ventilation system broke...
IMG_2602.jpg

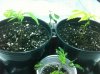
I did LST from the beginning to get them ready to ScrOG
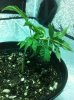
IMG_2629.jpg
IMG_2630.jpg

More LST.
IMG_2649.jpg

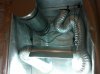
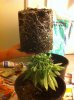
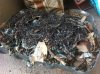
Heres the roots when I transplanted from 1 gal pots to 3 gal pots.
IMG_2666.jpg

Final LST before putting the screen on.
IMG_2691.jpg

I built the screen myself by making a wood frame with a nail every 2.5 inches and running string around them. This way I have a much tighter screen then if I had used a fabric net.
IMG_2696.jpg

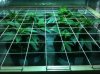
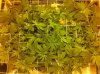
Above shot as the girls filled in the screen. At this point I began gradually thinning out the growth under the screen that wasnt getting any light as well as leafs above the screen that were blocking light to nodes. I always tuck first, then cut a leaf in half if I cant tuck it, and only completely remove the leaf if I have to.
IMG_2720.jpg

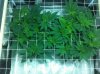
This was at about 4 and a half weeks. You can see by the change in color that this is where I switched from MH to HPS and flipped the lights from 20/4 to 12/12. This was about 4 days after I switched to flower i think so the stretching was already starting. I continued to slowly thin out the growth under the screen.
IMG_2736.jpg

This picture is from today! The girls have been starting to show buds for about 3 days now, it has been so excited! Now I have cleared out all of the leafs and small nodes that were under the screen for extra ventilation and so that they don't draw energy away from the growth above the screen that is actually receiving light. I did this slowly over a few weeks as to not stunt the growth of the plant or cause it to hermi.
IMG_2752.jpg

I believe in letting the soil get good and dry between every watering. I started out giving them a half a gallon each every 3rd day, and now recently since they have started drinking a lot more I now give them a half a gallon every other day. I gave them molasses every watering since the begining. About 2 weeks in I started giving them a tiny amount (2ml per gallon) of BioGrow every other watering and have worked my way up to 10ml per gallon of BioGrow, 10 ml per gallon of BioBloom (since 12/12), and 5 ml of Cal Mag supplement every other watering. I got a free sample of Neptunes Harvest which I really like but dont have much of so I use it every 3rd fertilization instead of biobiz.

I think that pretty much sums up my grow to this point... stay tuned for some buds!

:peace: The Naturalist :peace:
 

Attachments

TheNaturalist

Active Member
I havnt had much time to get emerged into the ROI community yet but will be diving in soon. Untill then. heres a quick update. The buds are coming in nice with tuns of long white hairs and resin forming. Unfortunately you cant see the details in my crummy shots...

Heres a close up:
IMG_2757.jpg

And the canopy:
IMG_2758.jpg
 
nice grow man, what r ur temps compared to ur ambiant temps with that 400cfm fan? how noticeable is the noise from outside the tent?

B E zzz :joint:
 

TheNaturalist

Active Member
Thanks MrNiceDude! And welcome to RIU, im honored to have your first post be in my grow journal! I did the math once and with the 400cfm fan and my little grow tent it replaces all of the air in there once every 10 seconds or so, so that combined with the cool tube keep the temps really low. I wouldn't say it stays exactly the same temp as my room but it only climes two or three degrees above. In San Diego its about 75 most days and it stays under 80 in there.

The noise is kinda a bummer though. Its pretty loud. My tent is in the corner of my room right next to the bed where me and my girlfriend sleep, the first week it gave me really weird dreams but now its kind of soothing. Its white noise so it doesn't keep me up at all I might even go as far as to say it helps me sleep. Pretty loud though...
 
cool, good info bro, yea ive been ceepin around riu for a little while and ur setup moved me to post lol, im planning on a similar setup with a 250, how r the girls...

B E zzz:joint:
 

TheNaturalist

Active Member
Sweet, with a 250 watt you wont need nearly 400 cfm of fan to keep it cool so noise shouldnt be too big of a problem. 400 cfm is way more then i needed but i got it for a great deal, only $150 for the fan filter combo on TheHydroSource.com. Id recommend them if your still shopping for equipment, they treated me well and will give you a discount if you email them! A lot cheaper then my local hydro store but still a little more expensive then Amazon. Anyways... my nugs are fattening up nicely :hump:


Heres some shots I snapped today:
IMG_2780.jpgIMG_2781.jpgIMG_2782.jpgIMG_2783.jpgIMG_2787.jpg

Also, I just placed a order with The Attitude seed bank for some new genetics. Took advantage of all the promos they are running right now to get a tun of free seeds with my order. Cant wait to pop those Holy Grails and White Widows to get myself some good mothers!


  • QtyProductCodeStockPriceLine Price
    DNA Genetics Seeds Holy Grail Kush Feminized
    Feminized Seeds Per Pack: 06 Seeds
    DNA863∞$95.26$95.26
    Pick and Mix Seeds Dutch Passion Blueberry Feminized
    Pick & Mix Seeds per pack: 01 Seeds
    PICK AND MIX SEEDS∞$19.04$38.08
    Green House Seeds White Widow Feminized
    Feminized Seeds Per Pack: 05 Seeds
    GH11AFEM - GH11BFEM/GH11AFEM∞$47.62$47.62
    FREE Green House Seeds The Doctor Feminized 1 SeedGH Promo∞FREE!FREE!
    UFO#3 CH9 Female Seeds Blue Lemon ThaiFREE SEED∞FREE!FREE!
    UFO#2 CH9 Female Seeds JackFREE SEED∞FREE!FREE!
    FREE Eva Seeds Jamaican Dream FeminizedEASTER PROMO∞FREE!FREE!
    FREE EVA Seeds Monster FeminizedEASTER PROMO∞FREE!FREE!
    FREE EVA Seeds TNT Kush FeminizedEASTER PROMO∞FREE!FREE!
    UFO#1 CH9 Female Seeds ClusterFREE SEEDS∞FREE!FREE!
    UFO#4 TH Seeds MKage FeminizedFREE SEEDS∞FREE!FREE!
    If your total order is $190.55 or more you will receive UFO#5 Cali Connection Seeds Buddha Tahoe OG Feminized absolutely free!
    - Remove ItemSubtotal:$180.96
    Discount Coupon
    purple420
    -$18.10
    Basket Total:$162.8
 

ihavealotofquestions

Active Member
RIU, ha. This is so sick dude I could never spend close to $200 on seeds myself though, if I had the money yeah but damn haha. What size tent you got goin? That filter looks pretty damn big
 

TheNaturalist

Active Member
Yeah it's a lot of money but that's part of the game. Sure I could have bought clones for $10 a pop, but when you break it down these seeds cost me less then $10 each and im getting the exact genetics that I want without the infestations that come with addin clones to your grow all the time.

My tent is a GL80 it's 2.5x2.5x6, that filter hardly fits in there haha it's funny though my fan and filter were on sale for $150 so they were actually cheaper then buying a smaller set.
 

ihavealotofquestions

Active Member
That's pretty dope dude I like the setup, I love the cooltube. I'm looking to get a GL60 and get 4 bubbleponic/aeroponic buckets going here soon. Was finnin' a 150w Sun Systems light, still can't figure the damn lighting situation out though. You get limited space with a tent and you have to work with it haha.
 

TheNaturalist

Active Member
Thanks! yeah the cool tube is awesome. One of my good friends from school is a pre med so he is taking all kinds of advanced classes like physics and he explained to me that as light disperses it becomes exponentially weaker. So what that means is that when you are able to put a light twice as close the light hitting your plants isnt just twice as strong, it is actually four times as strong! SO, by using a air cooled light like my 400 watt cool tube and putting it only 6 inches away from my plants its the equivalent to having 1,600 watts at a distance of 12 inches from the plants. Of corse now that my plants fill up the whole grow area I had to move the light farther away so that the light hits all four coners of the canopy instead of just being focused on the middle, but it was great to be able to have it real close during veg. The cool tube doesn't emit hardly any heat so there is no issue with burning the plants, its definitely worth it to get the air cooled light.

You might be a little crammed putting 4 plants in a GL 60 though... Im sure you could do it if you flower them early so they dont get too big, but consider that I have a GL 80 and my tent is FULL with only two plants. Heres some shots of the canopy and the buds as of today:

IMG_2790.jpg
IMG_2791.jpg
IMG_2792.jpg

My grow being organic its very important to maintain a healthy population of beneficial bacteria to break down my organic nutes and make them available to the plants as well as provide nutrients that are already available to the plants, thats why I have taken on worm farm farming! I created my own vermiculture so that i can start making my own top notch organic worm castings to mix with my potting soil and make worm teas with for watering! It was really simple ill explain it incase anyone is interested in making their own. What I created is known as a stackable system. It is great because it separates the worms from their castings for you making them easy to harvest. It is made up of multiple stacking trays with holes on the bottom. The holes allow airflow, drainage, and most importantly they let your worms travel away from their castings and up into a new tray full of food when its time!

To create the stackable trays I took one of those big 5 gallon water jugs, cut it in half, and punched a tun of holes in the bottom. I have another jug also that still needs to be cut but eventually I will have 4 trays. These jugs make good trays because they are shallow and wide which is perfect for composting worms (they are surface feeders) plus they stack nicely. Heres a picture of one of the trays before I added my bedding:

IMG_2795.jpg

To get my first tray started I made bedding out of shredded newspaper, cardboard, and leafs (maple and cannabis) which I soaked in water for about 30 min and then rung out all the water I could. I fluffed this bedding and mixed it with 15 pounds of composted cow manure that was full of red worms. The 15 pounds of manure is a little too much material for my tray, but as the worms break it down its mass will go down drastically so it should all fit much better pretty soon. The manure was advertised as having at least 200 red worms, which is about .2 pounds of worms. Thats not enough for a really active system like I would like, so today I picked up another 200 red worms from WallMarts live bait fridge as well as 25 green night crawlers and another 25 of some other sort of night crawler. The night crawlers arnt as good for composting as red worms but I wanted a little variety in my system. So heres a shot of the first tray with its roughly 450 worms (.45 pounds), you can see a lot of the night crawlers on the top of the bedding:

IMG_2797.jpg

The system is really simple: 1) feed the worms half of their body weight in food scraps per day (about a quarter pound of food) by burying it in their bedding 2) once their bedding has converted to about 80% worm castings add tray with fresh bedding on top of the current one 3) Continue adding food to the top tray and wait as the worms finish up the last of the food in the bottom tray and move up into the new tray in search of new food 3) harvest the pure worm castings from the bottom tray!

Its that simple to make your own organic fertilizer for cheap! I plan on utilizing three trays at a time so that the bottom tray has plenty of time for all of the worm eggs in it to hatch before I remove it. I want all those baby worms! apparently the worm population can double every 60 days, so I am looking forward to having a full pound of worms in the near future! Anyways... I hope that someone found my little tutorial helpful in putting together their own low budget vermiculture :bigjoint:
 

Attachments

Mister Sister

Active Member
Yes! Thanks for bringing your vermi techniques to the table!

Props to you for actually taking the time to grow some good organic bud. Worm tea is so damn good for plants!
 

TheNaturalist

Active Member
Thanks Mister Sister! Im stoked on my new vermi setup so im happy to share it with the RIU community. I cant wait to start getting castings for my plants! Im going to be upping the size of my grow soon so I will use the castings in my soil mix as well as use teas for fertilizing. I havnt yet made a tea but soon enough I will be using them on the reg, I have read great things so I am really excited! Thanks for the props :bigjoint:
 

TheDuder

Active Member
Subscribed for the ride. Just started my first SCROG myself under a 400w with 2 old THC Bomb mothers. Great setup. Its good to see people doing it right and investing where its deserved. I invested heavily in my larger 100sq. ft. room and pat myself on the back for it all the time. Starting 44 more White LSD now.

+Rep for a great set-up! Plants looking chunky too.

-Dude'e
 

TheNaturalist

Active Member
Welcome Dude'e, I just checked out your journal and it looks like we have a really similar thing going as far as your 2 TCH Bomb mothers in flower. Although that is just a fraction of your grow, you've got a lot goin on im pretty jealous! 100 sq. ft is going to be incredible when youve got it running at full capacity. I just made a offer on a new condo today that I will hopefully be into this summer. Once Im there I will be upgrading my grow from one tent to 3 closets so it will be a big step up for me but still nothing like what youve got going. Either way, I think its important that we are both doing it the right way, it will pay off at harvest time
Thanks for the rep, im real proud of my nugs :weed: Im only a few weeks ahead of you in flower so yours will be there soon!
 

TheDuder

Active Member
I am loving the Scrog so far. It would be a lot of hassle in a larger room, but in a closet, perfect. I always prune to get the canopy effect.

I have almost 30 new girls sprouted today and the rest should poke out of the Rapid Rooters tomorrow. My larger room will be in full swing in a couple weeks. Can't wait to try the new White LSD. They make crazy claims about it. We shall see.

-Dude'r
 

TheNaturalist

Active Member
Yeah anything deeper then about 2 and a half feet would be too big for me to scrog because I wouldnt be able to reach under and train the branches in the back. I was thinking if I ever get a full room that I might make a 2.5 foot deep screen all the way around the edge of the room and then depending on the size of the rooms maybe a little "island" in the middle (kinda like a lot of kitchens are designed) so that i could get to everything. Idk I havnt put a tun of thought into it though, scrogs my just not be efficient in large spaces like that. I almost bought LSD just because I liked the name haha the pics I saw on ATTITUDE had tuns of long white hairs it was really beautiful. I think youll have fun with that stuff :)
 

TheDuder

Active Member
It's a cross of the new White Widow Max and LSD. I also have 3 G13 Haze fem seeds I am sprouting too. I had similar thoughts of a large room scrog. It wouldn't be to hard to pull off. Square footage under the lights is expensive so you must get the most out of it. I like the scrog for my mother's closet. I couldn't imagine training my larger room with such care and planning though. It would just be to must to keep up on. During flower I'd have to sit in the room and constantly push them back under

I have found, in my larger room, an even canopy can be similarly maintained through topping, LST and other methods for slowing growth. I frequently pinch stems that are growing a bit to fast. They slow for a couple days and then form hard scar tissue and explosive growth above the knot. Even with all these methods, I could not duplicate the efficiency of the scrog. You can really pack em' in there. I think I may continue to do this in my closet when I flower in there.

-Dude'r
 

UPNSMOKE23

Active Member
U look like you got everything dialed in. My last grow was a complete failer because of electronic ballast and bad bulb.
 
Top