jayay
Member
Hey guys, I wanted to share my upcoming starter panel with you guys. I've been wanting to build a cheap panel to learn before attempting something serious. When I saw those CXA3050's at $8.50, it pushed me over the edge. Garbage bin, but hey, great for learning I'm sure (4860 Flux (lm) @ 85 °C). I'll be running 2x Inventronics 4-chan drivers.
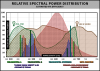
I'm not smart enough to figure out efficiency and stuff, but I can make up for it with an inaccurate and hard-to-read graph!
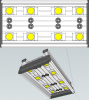
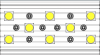
I'll be building on a "Makers LED" heatsink. It's T-slotted and around 50 bucks a foot. There's a guy on Ebay selling 12" NIB's for $40. This is how I think I'll lay them out.
When time comes around for building a system with a real footprint, this will probably be retrofitted for a salt water tank to try my hand at the salt water tank thing. Funny how cool hobbies overlap.
The last of the parts should be here in a few days. Build pics and stuff in the forthcoming days.
Thank you to the RIU community and serious props to the electrical wizards dropping gems.
- 2x Inventronics EUC-160Q070DT
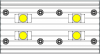
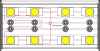
- 8x CXA3050-0000-000N00W230F
- 8x "Ocean Coral White" 3-up
- x8 CXA3050 35V @700mA = ~196 Watts
- x8 "Ocean Coral White" 9v @700mA = ~50.4 Watts
I'm not smart enough to figure out efficiency and stuff, but I can make up for it with an inaccurate and hard-to-read graph!
I'll be building on a "Makers LED" heatsink. It's T-slotted and around 50 bucks a foot. There's a guy on Ebay selling 12" NIB's for $40. This is how I think I'll lay them out.
When time comes around for building a system with a real footprint, this will probably be retrofitted for a salt water tank to try my hand at the salt water tank thing. Funny how cool hobbies overlap.
The last of the parts should be here in a few days. Build pics and stuff in the forthcoming days.
Thank you to the RIU community and serious props to the electrical wizards dropping gems.