Welcome everybody to my first DWC growing! I will be posting weekly all the relevant material to the tracing of this crop. As you may notice, spanish is my first language so excuse me if I have grammatical mistakes ") . I will list down the initial setup used:
. I will list down the initial setup used:
Tent: 0.60*0.60*1.60 m (CultivARG)
Seeds: BSF Feminized Gorilla Glue (70% sativa - 30% indica)
LED: 200W COB LED (homemade) and after 2/17/21 J60 Quantum Farmer (65w, 3500K + 660 Nm) PPFD: 2.01
Buckets: 2 20L buckets (homemade)
Nutrients: KAWSAY Nutrientes (A, B, VEGE & BLOOM)
Other products used: Bioproyect Mycorrizes & Trichodermas (30ml each)+ Namaste Mycorrizes (300g) & TrichoMix (1L)
pH and EC measurers
1 16 inches fan (intraction)
1 4 inches cooler (extraction)
2 air pumps (with 2 outlets each)
5m of hose (for the air pumps and for the tank level indicator)
hooks (for LST)
2 jiffys
2 small pots with additional holes in the bottom
pumice stone
poxilyn (for the DWC bucket construction)
4m of plastic covered wire
2/7/21: Germination
So lets start by the beginning of everything: germination. First of all, I put my seeds inside a cup with water at pH= 5.5 and added 2 or 3 drops of peroxide (it shouldn`t be a glass one but if you don`t have another one its all right). Then, placed it in a dark place for 24 - 36 hours. This 2 steps will provide the seed the necessary amount of water for it to get hydratated and crack its external layer. The time you have to leave the seed inside the cup depends on the quality of the seed, how it was storaged, etc. and as they start cracking, I recommend to continue the germination with the paper towel method. When moving the seeds from the cup to the paper towel I suggest you to use a spoon. Since I started using this method my successful germination rate has been 100%") .
.
2/8/21
From the plate with paper towel to the jiffy: after the roots were about 1.5cm long, I decided to move them to the jiffys. I hydratated them with water at pH= 5.5 and then I did a 2cms depth hole in the center of each with a sushi stick") .
.
2/8/21
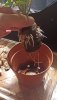
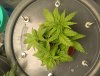
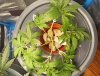
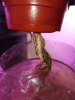
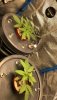
After this, I moved the 2 jiffys to the indoor and placed them over a plastic tray (everything over the buckets, 30cm away from the LED) , so that I could hydratate them with water (at pH=5.5 with mycorrizes). Both jiffys stayed over the tray for approximately 3 days until the roots went through the bottom of them (image). Before moving everything inside the indoor I cleaned the indoor with alcohol 70% as well as the rest of the room with cleaning products. Hygiene is VERY important in hydroponics in order to avoid pathogens, plagues, etc. so don`t be lazy and clean everything before you start (and specially clean your indoor after every solution change).
Both plants on the tray
2/11/21: First bucket preparation
So, after 4 days I began the germination everything was ready to fully load the buckets and see what happened. At first I germinated only 2 seeds, so we will name them #1 & #2 to differentiate them (and then #3 will appear).
For #1 bucket I prepared the nutritive solution at pH= 5.5, 760ppm and 6 tea spoons of Namaste Mycorrizes.
For #2 bucket I prepared the nutritive solution at the same pH, 550ppm and 10 tea spoons of Namaste Mycorrizes.
Note that since day 0 I used approximately 25-30% more nutrients than the recommended by KAWSAY on plant #1 and 10-15% more on plant #2 (I kept this "excesses" during the whole growth)
Also, pH and ppm parameters were controlled and corrected on a daily basis.
It`s very important to register all the values measured daily (pH, ppm and temperature), so that you can realize how plants feed and behave depending on the temperature, stage, genetics, etc.
LED distance to the plants was mantained (about 25- 30 cm away) in order to keep temperature below 29ºC.
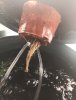
I noticed the Namaste Mycorrizes dyed the water so I wasn`t able to see the real color of the roots (BIG mistake)
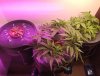
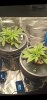
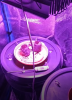
2/17/21: New LED J60 Quantum Farmer
This day the new LED arrived and these little plants couldn`t be happier. This new equipment does not produce any heat and has a VERY high efficiency (65watts = 270 watts of COB LED) so it definitely replaced my homemade humble 200w COB LED.
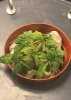
Plant #1 is on the left and #2 on the right
Using the new led for the first time
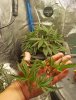
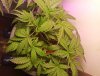
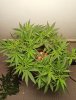
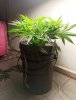
2/24/21: First topping
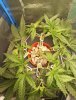
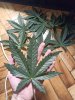
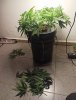
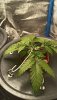
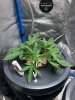
The plants` first 2 weeks were great. Both of them reached 6 nodes so I decided to do a topping right above the second node on plant #1 (leaving nodes 1 & 2) and above node 3 on plant #2 (leaving nodes 1, 2 & 3). Leave a 1cm stem below the cut. Then 2 days later, I tied them up using the plastic covered wire in order not to stress them too much the day I topped them. Below, you can see a picture of #1 before being tied, and 2 pictures of #1 and #2 after being tied. As you may see, plant #2 didn`t take well the topping as it seemed a little bit stressed...
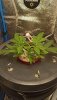
Plant #1 before LST
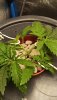
Plant #1 after LST
Plant #2 suffering the stress
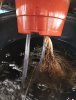
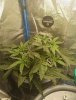
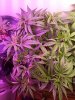
2/27/21: Bad news
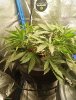
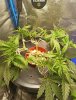
So 3 days after they were topped, we came across bad news. While plant #1 was exploding, plant #2 was just about to die. When I decided to lift the top of the bucket of plant #2 to measure pH and ppm, the roots fell down (literally, they slided and fell inside the nutritive solution). They were dyed by the Namaste Mycorrizes so I couldn`t really see the health of the roots, so here we can see my first big mistake. Since then, both plants grew at differents rythms.
Plant #1 exploding
Tent: 0.60*0.60*1.60 m (CultivARG)
Seeds: BSF Feminized Gorilla Glue (70% sativa - 30% indica)
LED: 200W COB LED (homemade) and after 2/17/21 J60 Quantum Farmer (65w, 3500K + 660 Nm) PPFD: 2.01
Buckets: 2 20L buckets (homemade)
Nutrients: KAWSAY Nutrientes (A, B, VEGE & BLOOM)
Other products used: Bioproyect Mycorrizes & Trichodermas (30ml each)+ Namaste Mycorrizes (300g) & TrichoMix (1L)
pH and EC measurers
1 16 inches fan (intraction)
1 4 inches cooler (extraction)
2 air pumps (with 2 outlets each)
5m of hose (for the air pumps and for the tank level indicator)
hooks (for LST)
2 jiffys
2 small pots with additional holes in the bottom
pumice stone
poxilyn (for the DWC bucket construction)
4m of plastic covered wire
2/7/21: Germination
So lets start by the beginning of everything: germination. First of all, I put my seeds inside a cup with water at pH= 5.5 and added 2 or 3 drops of peroxide (it shouldn`t be a glass one but if you don`t have another one its all right). Then, placed it in a dark place for 24 - 36 hours. This 2 steps will provide the seed the necessary amount of water for it to get hydratated and crack its external layer. The time you have to leave the seed inside the cup depends on the quality of the seed, how it was storaged, etc. and as they start cracking, I recommend to continue the germination with the paper towel method. When moving the seeds from the cup to the paper towel I suggest you to use a spoon. Since I started using this method my successful germination rate has been 100%
2/8/21
From the plate with paper towel to the jiffy: after the roots were about 1.5cm long, I decided to move them to the jiffys. I hydratated them with water at pH= 5.5 and then I did a 2cms depth hole in the center of each with a sushi stick
2/8/21
After this, I moved the 2 jiffys to the indoor and placed them over a plastic tray (everything over the buckets, 30cm away from the LED) , so that I could hydratate them with water (at pH=5.5 with mycorrizes). Both jiffys stayed over the tray for approximately 3 days until the roots went through the bottom of them (image). Before moving everything inside the indoor I cleaned the indoor with alcohol 70% as well as the rest of the room with cleaning products. Hygiene is VERY important in hydroponics in order to avoid pathogens, plagues, etc. so don`t be lazy and clean everything before you start (and specially clean your indoor after every solution change).
Both plants on the tray
2/11/21: First bucket preparation
So, after 4 days I began the germination everything was ready to fully load the buckets and see what happened. At first I germinated only 2 seeds, so we will name them #1 & #2 to differentiate them (and then #3 will appear).
For #1 bucket I prepared the nutritive solution at pH= 5.5, 760ppm and 6 tea spoons of Namaste Mycorrizes.
For #2 bucket I prepared the nutritive solution at the same pH, 550ppm and 10 tea spoons of Namaste Mycorrizes.
Note that since day 0 I used approximately 25-30% more nutrients than the recommended by KAWSAY on plant #1 and 10-15% more on plant #2 (I kept this "excesses" during the whole growth)
Also, pH and ppm parameters were controlled and corrected on a daily basis.
It`s very important to register all the values measured daily (pH, ppm and temperature), so that you can realize how plants feed and behave depending on the temperature, stage, genetics, etc.
LED distance to the plants was mantained (about 25- 30 cm away) in order to keep temperature below 29ºC.
I noticed the Namaste Mycorrizes dyed the water so I wasn`t able to see the real color of the roots (BIG mistake)
2/17/21: New LED J60 Quantum Farmer
This day the new LED arrived and these little plants couldn`t be happier. This new equipment does not produce any heat and has a VERY high efficiency (65watts = 270 watts of COB LED) so it definitely replaced my homemade humble 200w COB LED.
Plant #1 is on the left and #2 on the right
Using the new led for the first time
2/24/21: First topping
The plants` first 2 weeks were great. Both of them reached 6 nodes so I decided to do a topping right above the second node on plant #1 (leaving nodes 1 & 2) and above node 3 on plant #2 (leaving nodes 1, 2 & 3). Leave a 1cm stem below the cut. Then 2 days later, I tied them up using the plastic covered wire in order not to stress them too much the day I topped them. Below, you can see a picture of #1 before being tied, and 2 pictures of #1 and #2 after being tied. As you may see, plant #2 didn`t take well the topping as it seemed a little bit stressed...
Plant #1 before LST
Plant #1 after LST
Plant #2 suffering the stress
2/27/21: Bad news
So 3 days after they were topped, we came across bad news. While plant #1 was exploding, plant #2 was just about to die. When I decided to lift the top of the bucket of plant #2 to measure pH and ppm, the roots fell down (literally, they slided and fell inside the nutritive solution). They were dyed by the Namaste Mycorrizes so I couldn`t really see the health of the roots, so here we can see my first big mistake. Since then, both plants grew at differents rythms.
Plant #1 exploding
Attachments
-
 1.1 MB Views: 1
 -
 231.7 KB Views: 1


 .
.