Tis the season: bubblelicious and superskunk 400W grow

Kriegs

Well-Known Member
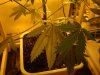
Pulled the males today and chowed them up in the disposal. Harvested a few pods off the male bubs first, then..Bye-bye. That just leaves the one big girl bub's, who put on 5 inches of stretch in the two days I was gone. She's at 33 inches right now. Not showing real flowers just yet, although she popped a bunch of large primordia this week. Set the frame up around her today to scrog her out as much as I can; should help the yield a little.

The soil layerings have been set up for almost a week. This journal is handy - I couldn't recall for the life of me how long they'd been there. One more week, and they should be ready to stand on their own.

The 4 skunks I germed are out and about and looking happy so far. Pics tomorrow fer sure.
 

Kriegs

Well-Known Member
Well, here she is .. the one girl. She looks really happy, though. She's kind of a leggy plant, a little lame on bud sites. But, we'll see.. She's at 33"; put on 5 the last couple days. Finally saw a real flower today.

A few pic's. Yeah, HPS sucs for pics, but you'll get the idea.

First - the plant, and the frame I built for her. Got 4 new superskunks popped in the cups; this time in 30/40/30 seed starter/MG Organic/perlite -- much cooler. Second - a nice fat primordia.. Third - a closer shot showing the fimmed top fanning out, and the start of my string trellis. Fourth and fifth -- a couple shots of my soil layering dealio. The last one is closer in the top with one of the first flowers showing.

Soil Layering method:

1. Cut a slot in a 4x4 ziplock container, and in the snap-on top. Drilled a shitload of 3/16" holes in it for aeration
2. Filled with MG organic w/ 20% perlite
3. Cleared leaves and buds from the lower 2/3rds of the stem
4. Girdled the stem in a couple places with a sterile razor knife
5. Press the cleared, girdled stem down in the soil, place duct tape across slot to keep in place and cover; moisten thoroughly.
6. Fasten the top placing the cut slot in the top opposite the other slot (stem back to plant goes thru it)
7. Wait about 2 weeks for roots :bigjoint: Make sure it stays moist in there.

Should work.. soil layering is supposed to be a low numbers / very high reliability cloning method because the attachment is maintained to the source plant. I'll be so stoked if this works. I can see a couple ways to do this bigger and better already.

Comments, questions welcome..
 

Attachments

Kriegs

Well-Known Member
i love the custom screen, your doing great bro!
Thanks man.. it's one of my favorite things about indoor growing -- seeing a need, then hitting the big box for $5-10 worth of whatever I need to fashion something up. Adapt and create. Gotta get busy finishing up the stringing.

I did kinda put myself "in a box" quite literally as to where those skunks will go when I upcan - the frame boundaries kinda split the best remaining light on the outside. Hmmmm ...

I really like this scrog plan. I was bummed about the males initially, but that's turned around now into a challenge to squeeze as much as possible out of this one plant, and throw a little layering and 12/12-from-seed to boot. I was really lucky the one plant that really fanned out from the FIM was the only female!:-P She seems to really love being the center of the 400W's attention.
 

Kriegs

Well-Known Member
I'm often asked here or elsewhere why I water straight-up with pH 8.0 water; no adjustment. It's a fair question that I usually enjoy answering, but sometimes I get a dose of ad hominem to go with it, which I don't appreciate since the science of the matter is so clearly on my side. Anyway, it's all about humics and acid bufferingn, and the fundamental nature of potting soils.

Check my recent post here:

https://www.rollitup.org/marijuana-plant-problems/251235-stop-blaming-issues-ph-people-10.html

And check the links, too, if you think I'm full of beans.. I hope it helps you some way.

Cheers...
 

Kriegs

Well-Known Member
Just a quick update.. the big girl has fanned out good in the screen and is starting to form real buds; still stretching, too. The 4 skunks are looking great after only one week out of the soil. They seem to like the 12/12 deal so far. Watered them one last time before I upcan them Saturday to 1-gal. Checked the soil layers - the soil settled in there more than I thought. They weren't exposed, but it was less than ideal. Lesson for next time: use a seed starter -- it's finer and will make better soil contact. So far, so good...
 

Bob Smith

Well-Known Member
Kriegs, harvesting my bubblelicous on Sunday - stinks just like bubblegum, pretty stoked to be able to smoke it (need to stay clean, but my girl's been smoking it and loves it).

Also took 196 (not a typo) super skunk clones today for my next run - kinda funny that I found the exact opposite to be true in regards to the two strains; my super skunk is 10X as vigorous as my bubblelicous.
 

Kriegs

Well-Known Member
Kriegs, harvesting my bubblelicous on Sunday - stinks just like bubblegum, pretty stoked to be able to smoke it (need to stay clean, but my girl's been smoking it and loves it).

Also took 196 (not a typo) super skunk clones today for my next run - kinda funny that I found the exact opposite to be true in regards to the two strains; my super skunk is 10X as vigorous as my bubblelicous.
Hey, Bob.. thanks for dropping in. Glad to hear you got your bub's to the end.

One thing about those superskunks -- they did not like starting out in MG pre-ferted soil. I popped 4 new ones in a cool 30/40/30 mix of seed starter, MG Organic, and perlite and these new ones are growing like crazy. Way more aggressive than the first time around..

The ones from before eventually "grew into" the MG and were taking off like crazy, but they were male so, adios. The soil stress early might have played into that.
 

Kriegs

Well-Known Member
Lots going on in the grow room today; I was in there about an hour and a half, which is a lot for this little Op.

The superskunks were really cooking this week; figured they were ready for upcan. Based on the roots, it was decent timing. They all had nice firm balls formed in there, but not wrapped or bound one bit. They could've gone longer, but it was kinda dicey having those cups perched on the trellis (like in the back of the third photo). One of 'em hit the floor earlier this week - the soil flew everywhere, but the plant and the ball stayed in the cup -- packed 'er back up and she didn't miss a beat. Anyway, the shelf and the bigger cans solve that problem.

The big girl looks great. She's filled out the trellis pretty well for one plant. There's three main tops, and 10 more just beneath them. I noticed last night, though, it was getting pretty pale down below -- she's ate up all the N in the soil already. Gave her a 1/3 dose today of 6-4-4. Now, that's how I want to be feeding -- to fill a need, not just pro forma and burning the shit out of em like last year. Could've been a little quicker though - I saw the bottommost leaf go yellow early this week - that was my clue.

Raised the light up today - 10" off the tops; 16-18" off the next tier.

Say hello to Blackie in the 4th photo -- awesome playing guitar; paid a whoppin' 150 bucks for it.
 

Attachments

Kriegs

Well-Known Member
Well, I guess it was worth a try, but the soil layers didn't take at all. I think I was a little too conservative with the cuts on the stem. I think you're supposed to cut a section right out of the phloem. Some rooting compound probably would've helped. Oh well, had it worked, it would've been a great way to multiply.

As you see in the photo, not a single root...:-P
 

Attachments

cme 1978

Member
i like your simple way also man i think we can do just as good without all the fancy ass shit out there. that you can pretty much put together and get the same results plus we are in a world were people do still have something against growers for some reason . just keep up the good work and hope to see some more pics.
 

Kriegs

Well-Known Member
Pollinated a branch last night using fdd2blk's method as described here:

https://www.rollitup.org/advanced-marijuana-cultivation/20319-seed-production-tutorial.html

I made one little twist on the method and dampened the brush before I loaded it with pollen. I did this to keep pollen from flying around where I didn't want it. The male I used was just gorgeous. Overall, his traits were better than the female plant, but she's the only one I have right now so I had to run with her. The pods popped on their own in the cup (pic), so I know for sure they were ready to go.

Checked the branch today - no sign of "take" yet. If I don't see it tomorrow, I'll repeat the process. It's mostly for shits and grins, though I'd be jazzed to have about 50 bubblelicious seeds or so to play with.
 

Attachments

Kriegs

Well-Known Member
Thanks, folks... the screen did a good job of maxing out the one plant. Kinda took over all the space, too, but I'm figuring ways around it.

The transplant pic's are on the previous page to this one... Cheers!
 

Tidalwavedave

Active Member
Looking great Kriegs. That sucks the soil laying did not work but still a nice experiment. The plant looks amazing should be some really nice medicine. It can only get better from here.
 

Kriegs

Well-Known Member
Looking great Kriegs. That sucks the soil laying did not work but still a nice experiment. The plant looks amazing should be some really nice medicine. It can only get better from here.
Thanks.. I think the soil layer deal would have had a better chance to succeed if I had actually stripped off the phloem for a 1/2 inch or so. And added rooting compound... Oh well, next time..

==================

Gave the big girl a 1/2 strength dose of 30-10-10 today to correct the N deficiency. That should cover her for now and into the future. The FF I used the other day was very light, and slower release N forms (so, no correction).
 
Top