Transplanting can be a very simple and clean process given you take the right protocol. Like I mentioned in the previous post soil moisture is not an issue since the tops of the solo cups are smaller then most peoples palms and can easily support the medium while upside down.
How I transplant:
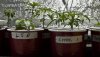
1) Fill the destination pots with soil so that the solo cup top is even with the new pot top so if you put the solo cup in the pot the tops are the same height.
2) Flush the current pot (solo cup) with enough water so that its completely saturated. Let sit and drain for 30 min.
3) I usually do this over the sink but you can do it anywhere you don't mind getting a little dirt on. But make sure both the new pot and bag of soil within arm reach.
4) Place the stem of the plant between your middle and ring finger and your palm on the soil. Once supported, Flip upside down.
5) With your free hand gently squeeze the middle of the pot from all 4 directions (ie left right, front back).
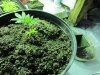
6) Remove old pot, put your free hand over the bottom of the plant (in this case the top since its upside down) and place in the new pot centered. If you followed the previous watering step, no soil should fall.
7) Add more soil to the surrounding edges of the "mold" in the new pot until its completely submerged.
")
Water well, I usually use half the amount of water that the pot is rated for (ie 3 gal pot, flush with 1.5gal) focusing the water at the edge where the "mold" meets the new soil.
I hope I didn't bore you with the details I just wanted to make sure that you understood the steps needed to make it a painless process. Good luck brotha, your going great.