Maverick’s Timber 4vs Grow Journal

Figure I’ll document my little seed sprouting experiment here too, in case it helps anyone else out.

There are so many methods of popping seeds out there and I’ve had successes and failures using many of them. But, just like my approach to cloning changed dramatically after seeing a video in Youtube by Cali Crop Doc which documented an experiment comparing cloning with a brand new sterilized razor blade and lots of time invested vs some dirty/unsterilized scissors and minimal time invested and showed zero difference in terms of success rate, time to root, or health of the clones, my attitude and goal has been to try to simplify and minimize the time required to do the more tedious and/or nerve wracking aspects of growing.

So, when I saw a recent video by Mr Grow It in which he tested the truth of whether the paper towel method was indeed faster and more effective vs straight to soil (both with and without pre-soaking) which showed that the straight to soil method was actually the fastest and had just as much success rate, it got me thinking whether I was over complicating things.

To test it out I decided to test putting some seeds straight into presoaked rapid rooter plugs and soaking some other seeds for 24 hours before putting them into the presoaked plugs.

Unfortunately my seedling/clone tent already has some clones rooting in my larger cloning tray and I didn’t have room for the second smaller seedling/clone tray/dome so I’ve got them rooting in my closet under the basement stairs.

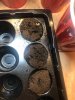
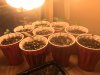
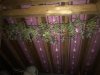
In the picture the row closest to the camera are the seeds that I just stuck straight into the plugs and the back row are the ones I pre-soaked.

The first seed to sprout was actually the back second to the right seed (a Dinamed CBD Plus). However, after that the Dinamed in the front, Acapulco Gold in the front (bottom far right) and Mazar I Sharif (bottom second to the left) all sprouted and seemed to be more vigorous and shed their seed shells more easily.

Next was the Acapulco in the back right spot, then the Mazar in the back, and most recently the Jamaican Shipwreck in the bottom left spot.

So, so far my experiment is confirming what Mr Grow It experienced and suggests that putting seeds straight into already soaked/moist media seems to be the fastest, least complicated, and equally effective method of popping seeds. Will keep updating though as time goes on to see what happens with the second JS and the 2 Pine Tar Kushs which haven’t sprouted yet.View attachment 4456221
when you use those rapid rooters do u use it upside down? i seen where someone said to do that bc it makes them easier to get out the tray. i noticed urs were not flush so i guessed maybe u flipped them as well and seen that video as too lol
 

LCPGrower1980

Well-Known Member
when you use those rapid rooters do u use it upside down? i seen where someone said to do that bc it makes them easier to get out the tray. i noticed urs were not flush so i guessed maybe u flipped them as well and seen that video as too lol
I’ve seen that too, but no, mine are right side up. I can definitely attest to the fact that they can be hard to get out of the tray, but I’ve always been able to get them out. Might try the upside down method at some point in the future though as I am all about efficiency.
 

LCPGrower1980

Well-Known Member
Update on my seed sprouting experiment. All but the 2 Pine Tar Kush’s have sprouted and been transplanted into Solo cups.

The PT that I soaked is in the process of germinating but hasn’t sprouted yet, probably another day or two till she breaks ground.

The PT that I didn’t soak still hasn’t budged, so I threw another one into a Rapid Rooter as that other one could just be a dud seed. Even if they all sprout, they are Regular seeds, so most likely at least one will be a male and get tossed. And I have some friends who grow who I’m sure would be happy to take one of them off my hands if I wind up with 2 females.

So, so far it seems like the straight to soil method works at least as well as the soaking, then into soil method.BD70D6B5-BEC9-42B4-B617-EC7C0EBB0B63.jpeg
 

LCPGrower1980

Well-Known Member
Hey everyone, hope you are all enjoying your weekends.

Another update on the seeds, the first of the Pine Tar Kush seeds has sprouted! I had seriously been worried it wasn’t gonna make it with as long as it had been cracked open with no apparent progress. But to my pleasant surprise it finally sprouted!
And the second PT seed has cracked open and is starting to germinate too! Looks like I may wind up with 3 of them after all.

Will check back in tomorrow with some pictures from the flower tent on the last day of week 3 of flower.
14F23404-4789-49F0-9D08-74BEA463A91D.jpeg
 

LCPGrower1980

Well-Known Member
Flower tent update, last day of Third week of flower. The girls are looking beautiful (for the most part) and the trichomes are really shimmering!

I am really excited to see what these Lambsbread plants are going to yield. I think that whatever I wind up yielding, I could probably have nearly doubled it had I filled the tent with those (and maybe the Skunk #1’s).

Still hopeful to at least yield 2 oz’s if not 3 per plant average (might get 3-4 per Lambsbread).91D6B7B0-3B86-4247-AB78-D09BFC4DA513.jpeg148B2D53-05C3-4474-A6EB-32E77EB7DB0B.jpegE3A63F6F-E58F-447C-B773-CD458218773C.jpegA69A7431-EDA2-47CE-9CF7-EC1F62DAFD10.jpeg74181D68-23C4-4D54-9A99-4B514E6766EF.jpeg
 

LCPGrower1980

Well-Known Member
Seed sprouting update.

All seeds have sprouted and all but one Pine Tar are in soil.

Results of the experiment and conclusions:

First, all seeds eventually sprouted, so both methods seem equally effective in that regard.

Second, as a trend, the straight to rapid rooter cubes averaged just slightly faster than the soaked, then planted seeds.

Third, my experiment seems to suggest that (at least compete) continuous darkness is not necessary to germinate/sprout seeds as both seeds were simply pressed down into the rapid rooter cubes and put under CFL lighting (18/6 lighting schedule) without covering the holes.

As a result of this, it looks like I’ll be going straight into the rapid rooter cubes to germinate my seeds from here forward as that method has fewer steps and is simpler and at least on average ever so slightly faster than soaking first.

Hope this has helped someone else who might be looking for simpler and/or faster methods of germination.C899EAF3-8F46-4A6B-BA06-B56118EA9158.jpeg
 

LCPGrower1980

Well-Known Member
Last day of week 4 in flower update.

The girls have really been using up the nutrients in the Michigan Made Mix I have them in at a record pace! This timber is throwing off some serious PAR and they have been eating it up. But, with faster growth does more use of Nutes.

As a result some of the girls were seriously hurting and starting to show serious signs of nutrient deficiency. Especially those in the back that it was harder to get to and feed.

Gave them all a heaping dose of the Roots Organics Uprising Bloom that I picked up though and they are actually looking like they are bouncing back a bit. The Super Skunk in the back right corner took a serious hit though and as a result so don’t think she’ll yield anywhere close to what she could have.

Also seeing some powdery mildew on some of the leaves of the plants that had some nute deficiencies (especially the Blueberry Kush, which can be seen in the last picture) but that’s expected seeing as how compromised she was. Looking better the past few days since the feeding and less PM.

Oh well, first time through using this light, so I’ll just chalk it up to experience and use it to make adjustments next go round.

On a positive note though these Lambsbread flowers are looking absolutely gorgeous! Looks like someone dipped them in sugar! The pics definitely don’t do them justice. And you can smell the tent upstairs, even though I’ve got a carbon filter on the tent! Yum!

Still 3+ weeks to go too, so hoping these colas continue to pack on size and frost! D861CFE4-EBDA-4131-A3DA-A55CE89B874E.jpeg7090CA79-E1D9-4945-A083-7816C92C1A0C.jpeg05F709EF-6B59-40FA-BD11-E27CDF60C3D9.jpegE301DB48-C3D7-4D7A-9EE3-B6FE49E7164B.jpeg61140628-D1E7-49E4-B546-B5391382C9D3.jpeg
 

LCPGrower1980

Well-Known Member
Flower tent update: Last day of week 5 of Flower.

Gave the girls another heaping dose of the Uprising Bloom dry amendments and they seem to be bouncing back. Definitely starting to see the natural “fade” and fall colors coming in though. The inner and lower growth is nice and green though.

Also decided to do some defoliation as the canopy was extremely thick and light wasn’t getting to the lower growth nodes. Also was seeing some powdery mildew in the lower growth (likely due to poor air circulation).

Since the defoliation and feeding though am definitely seeing the flowers stacking up more and much less PM.

Being my first run with this set up I was bound to make some mistakes I suppose, so I’ll just chalk it up to experience and use it to improve the next run.

Still excited to see how things turn out though. 2-4 more weeks to go at least, hoping they continue to stack up like they have been.FF1CC941-E1C4-4071-966D-336260801474.jpeg97A3EB96-1EFA-4B43-BDF6-3B392012E0CB.jpegB3B7DC2F-22B0-46FB-90DA-0BD027F7CD87.jpeg
 

LCPGrower1980

Well-Known Member
Well, the first grow with my Timber is in the books now. Checked the Lambsbread with my loupe last night and saw a bunch of ambers (actually more than I usually prefer) so I decided to chop her. Due to logistical issues of places to dry and looking at the Trichomes on most of the other plants I decided to just chop and hang everything.

This post will include a few pictures of girls last night before I chopped them, and I will post a second block of them as I was chopping them and 6 of them hanging in my tent (decided to use a SCROG to hang them from, workout out great!) and 3 more hanging in the attic (obviously they will get a little more light than those in the tent, but those were the 3 plants that were hurting the most and/or the least priority to me) once they were all chopped in another post below.

Overall I am extremely happy with how the Timber did, but being my first go round with it I definitely made some mistakes and came away with some lessons that I will apply to the next grow to improve.

Namely:

1) need to allow more space between the bottom of the SCROG and the top of the plants. In the past I had done this to allow watering, but this time with the auto drip system in place I didn’t anticipate the low clearance height being an issue. I was wrong, which bring me to my next lesson

2) the Timber produces a lot of PPFD, much more for the space than any of the lights I’ve used in the past. As such, the plants also need a lot of nutrients to be able to utilize the photons. Because of this, and the need to grow them out a little bigger to give enough clearance for the SCROG, I would either need to grow them in significantly larger pots (which I don’t want to do) or, what I found will work (after I had already screwed it up of course) is top dressing/watering in organic amendments.

3) while the Roots Organics Uprising Bloom did ok with allowing the plants to limp along till harvest, it didn’t seem to provide them with enough to really thrive or fully bounce back. In the past when I’ve had such serious nutrient deficiencies (mostly while growing outside) I was able to transplant them into a larger container of M3 and they would bounce right back. Because that’s not really an option here though, I’ve decided to buy some of Papa’s Perfect Poop, which is the nutrient mix and dry fertilizer already present in the M3 and sold by the same company. Hoping that will keep the next crop going strong all the way to harvest.

4) need to raise the pots off the ground. Both because, being that it’s the basement floor it gets cold, to allow air to the bottoms of the pots/roots, and to prevent them from potentially sitting in water (happened a couple of times when I didn’t have the auto drop dialed in yet). To accomplish this I got some plant risers.

5) Need to do a leaf strip/Schwazzing both at flip and 3 weeks into flower. Being such a dense canopy with so many colas packed into the space, the circulation and light penetration in the lower canopy really suffered which resulted in the colas not filling in as much as they could have and PM developing in spots. I’ve done defoliation in the past, but found that it didn’t really positively affect my yield. That was however such a much less dense canopy and much less powerful lights which could have capitalized on the increased ability to get light to the lower nodes. It seems with this set up it’s a must as even with only less than a week of having opened up the canopy I saw significant increased in size and frostiness of the lower flowers.

6) Need to watch the stretch. Being that I’ve got a bunch of different strains in the same tent keeping the canopy even becomes very difficult, especially when some strains like the Lambsbread have a big stretch and some like the Candida have very little stretch. However, I’m thinking that trying to put the naturally smaller plants in the middle of the canopy where hopefully they will benefit from the more intense light by growing larger while the larger stretching plants can get closer to the light on the sides (which again will hopefully provide them with the greater light intensity they want). Unfortunately I’ve got a few new strains that are on deck, so this might be harder than if I was planning on running the exact same strains, but I’ll do my best based on the descriptions of the seed banks I got them from.

Thanks to everyone who has followed along to this point. Will check back in periodically with some pics of the clone/seedling tent and eventually to give a final dry weight tally.53A1E254-FE5A-46CE-AAE4-CFB2B5DE19A7.jpegFF0E15E3-6884-4F44-91B3-FB874CAC8B8B.jpeg54F6F11F-C4DB-4D0D-B83C-141BEA30D6A6.jpeg628A4C4B-5A12-4C0F-979F-B88F55EDEF2C.jpeg
 

LCPGrower1980

Well-Known Member
Looks great man, nice work!
Thanks Flatrate! Yeah, overall I couldn’t be happier with the Timber and the Orca. Made some snaffoos and one of my plants turned out to be a total dud, so I feel like it could have been even better, but overall am happy with this harvest. Next time gonna rock it even better!

Thanks for following along!
 

LCPGrower1980

Well-Known Member
Congratulations!! You obviously learned a lot on this grow, so thanks for sharing. Beautiful harvest.

Good to see that the Timber worked well for you too!
Thanks Twalte! Yeah, from only having ever used cheap blurple LEDs and CFL’s the jump
to a high performance light like the Timber was bound to have a learning curve. I’ve always maintained that the goal is to just continue to learn and try to use your experience to get a little better each grow.

Thanks for following along, will also check out your journal if you have one.
 

twalte

Well-Known Member
Thanks Twalte! Yeah, from only having ever used cheap blurple LEDs and CFL’s the jump
to a high performance light like the Timber was bound to have a learning curve. I’ve always maintained that the goal is to just continue to learn and try to use your experience to get a little better each grow.

Thanks for following along, will also check out your journal if you have one.
I’m just getting started with the Timbers....I’m literally on day 3 since i installed them. Came over from a HID light, so it’s all new to me too.

Whats next on your grow list? I’ll definitely follow along.
 

LCPGrower1980

Well-Known Member
I’m just getting started with the Timbers....I’m literally on day 3 since i installed them. Came over from a HID light, so it’s all new to me too.

Whats next on your grow list? I’ll definitely follow along.
I’ve got a clone of the:

-Lambsbread going in my clone/seedling/Veg tent (got the seed from Nukeheads; seems I lucked out as I had already blown nearly an entire outdoor season grow this past year as the result of having a male LB that was supposed to be a feminizes seed and also had a male Super Silver Haze from the same order that was supposed to be feminizes; along with the worst genetics I’ve ever seen in a female WiFi OG that just finished in the tent)

-Skunk 1 (from a local seed vendor)

-Super Skunk (even though it was hurting this time around I’m kind of sentimental about it and in the past it has yielded well for me; think it was just hurting from nutrient deficiencies this time around) from Nirvana Seeds

-Candida CD1 (grow that to make CBD infused oil for my son who has ASD)

I’ve also got:

-a couple (but will eventually choose just one and give the other one away) seedlings of Acapulco Gold from Barney’s Farm

-a couple Dinamed CBD plus seedlings (again, will probably choose the better of the two to keep and gift the other one away to anyone I know who might want her) from Dinafem seeds

-a couple Regular Seedlings of Mazar I Sharif (will only be keep the female or stronger female if they both are) from One Love Genetics

-a couple Regular Seedlings of Pine Tar Kush (again only keeping the [stronger] female plant) from One Love Genetics

-and a couple Regular Seedlings of Jamaican Shipwreck (may actually keep them both in the tent if they are both females, but will likely only keep the stronger pheno in the end and obviously only the female if the other is a male) from Sequoia Seeds

All those are in my seedling/clone/early Veg tent atm and are awaiting vacancy in the big Veg/Flower tent under the Timber.

I also picked up some 3 gallon Rain Science Grow Bags (RO use in place of the fabric pots) for this upcoming grow. Excited to see how those do!
 
Last edited:

Stoned Cold Bulldog

Well-Known Member
Thanks for following along Smoke! Hope you enjoy the journal.
when you use those rapid rooters do u use it upside down? i seen where someone said to do that bc it makes them easier to get out the tray. i noticed urs were not flush so i guessed maybe u flipped them as well and seen that video as too lol
they flip them upside down and make a new hole to germ them so the seedling grows easier instead of like mine which were a nightmare. u have to plug in the xtra media to cover the seed when right side up. plus the rapid rooters had were old. smdh grrrr
 
Top